Building an Inkle Loom
- A

- Oct 2, 2021
- 6 min read
Updated: Sep 28, 2022
So I was getting ready to go to an SCA event, and learned that there would be an inkle-weaving class - there was just one catch - you had to bring your own loom. Well I'd been wanting to learn how to weave for a while now (see that tablet weaving class from 2 years ago that I enjoyed but haven't followed up on), so this seemed like a great opportunity. The only challenge was that now the event was like 3 days away and I still needed a loom.
My original plan was PVC because I heard that those were cheap and easy to assemble, but I couldn't actually find many plans for how to assemble them. There are a few pictures of completed looms on Pinterest, but they don't show you how they got there. Hmm. Then I came across this tutorial on Instructables. I read through it a few times, and it didn't look too demanding. I would have to get some wood, and even with the cost of lumber skyrocketing these days, it's still just a few feet of 1x4, a single dowel rod and a little hardware. The biggest challenge was that to match the original design I needed a 3/4" drill bit to match my dowel rod. Slight hiccup...my largest drill bit was only 1/2". The dowel needs to be very strong to support the tension put on the loom, which is why most of the commercial looms are closer to an inch on the rods, if not even larger. I decided to compromise and use pine for the loom's frame and a 1/2" oak dowel for the pegs.

My first step was to start cutting my lumber into shorter lengths. I measured carefully and pulled out my saw. Unfortunately all I had was a hand saw, and it was exhausting. It took me the better part of an hour to cut through each segment of 1x4. I'm still shocked by how much work that was, because I've definitely cut through a blasted pine tree with less effort. I had a feeling that the cuts were not going to be quite as pretty as I'd like, so I made sure to use the cut ends from the store to butt up against the other pieces.

Next I had to cut my dowel into 7 roughly equal segments. I considered how difficult it was to cut the pine, and I looked at the oak, and I thought about the pine, and I looked at the oak. Then I posted a desperate plea on social media for any friends with an electric saw that I could borrow the following evening. One of my friends came through, and all 6 cuts were made in under 5 minutes. It was glorious. I want an electric saw!
Now it was time to start drilling holes in my wood to insert those new oak pegs. I pulled out my drill, and realized that I had misread my bit, and it in fact only went up to 1/4in! Back to the store in search of a drill bit. Of course neither of the two major home improvement stores carries the brand of drill that I have, and their packaging obscures the base so that it's hard to see what the shaft of the drill looks like. I managed to find an affordable spade drill bit that looked like it would fit my drill, so I got that and took it home. I grabbed the base of my loom just to experiment because I'm not familiar with spade bits. It drilled about 1/4" into my wood and then stopped.
I ended coming up with an absurdly complex system where I would pre-drill a pilot hole with my tiniest drill bit, drill one side of the wood with my 1/2" spade bit, flip the wood over, use the pilot hole to drill out some more with my 1/2" spade bit, and sometimes that would be enough to go through. But sometimes that wouldn't be enough. You see the sawdust would get stuck in the hole, so then I'd have to switch to the 1/4" bit just to drill all the way through to clear the dust. And then back to the 1/2" to finish drilling out the hole. Of course all of my bits had completely different sized shafts, so I had to keep readjusting my drill between bits, and I only had one clamp, so I couldn't drill multiple holes at once. It was a very tedious process.

Oh yeah, I still needed a long hole for my tension rod. A Dremel would have made this a breeze. However, as you might have guessed, I don't own a Dremel. I own a cordless drill and a handsaw. So I did horrible things with my drill - honestly I'm amazed that my 1/4" bit is still working and in one piece! I'll probably have to replace it soon, but drill bits are replaceable. I drilled a bunch of holes in a line, kind of perforating the place where I needed my tension hole to go, and then I rocked the drill from side to side. It mostly worked. There was a spot near a knot in the wood where it got a little wonky and wouldn't go quite straight. C'est la vie. I tried sanding down the hole to smooth it out a bit because it was rough, and I think that that helped.
Once I finally got all of my holes drilled. Yay! It was time to start gluing and screwing my loom together. Theoretically I could've started on this process earlier in the build, but I figured that it would make the drilling harder. Considering what a challenge that turned out to be, I think that I made the right call. I lined up my pieces, laid down some glue, drilled pilot holes, and screwed them together with tow screws. I'm very proud of myself because all 8 of my screws went in smoothly, and not one stuck out! Pilot holes were definitely a good choice. Time to glue in the pegs!
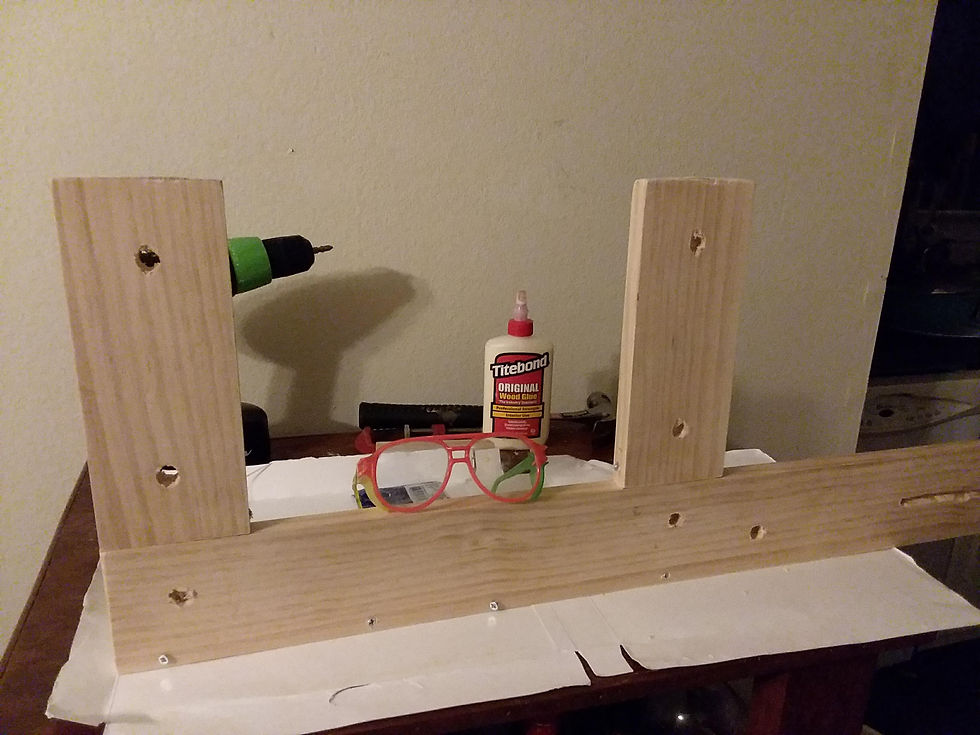
I put some glue on the pegs and shoved them into the holes and let everything dry. Whew! What now?
Onto the tension rod. My Instructables pattern had drilled a hole in some wood close in size to the dowel, but I knew that if I attempted something similar I'd probably go askew, poke out the side, and cut my hand. However, I couldn't leave the bolt raw because I'd damage the weaving. Off to the sewing room, and I came back with some sturdy canvas, I wrapped it around the bolt a few times, stitched up the end, and voila, a padded rod for my tension.
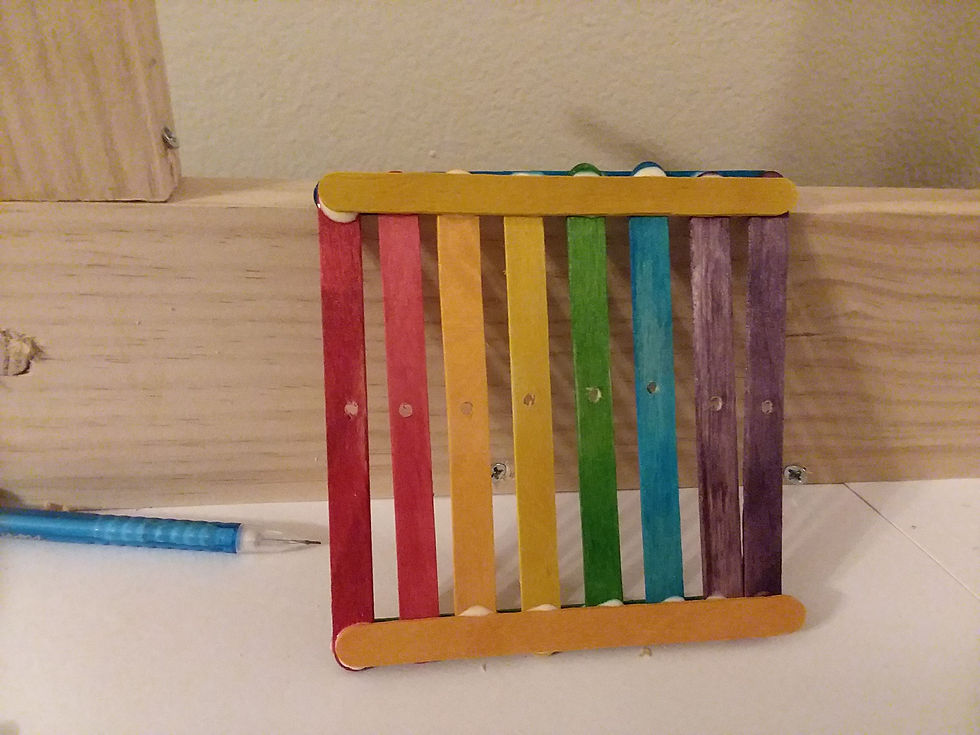
What else? Did I need to bring a heddle for my class? The directions just said to bring a loom. Hmmm... I started looking at some designs online, and really analyzing the shape. One piece with a hole and then a long free-standing section, and then another piece with a hole. Honestly, they remind me of combs that have holes in the teeth. Well now it's getting late, and the event is tomorrow, but inspiration strikes in many forms. So it's eleven o'clock at night and I'm drilling holes in rainbow colored popsicle sticks because, well, look at this masterpiece!
Fortunately, by sheer coincidence, I happened to have a small shuttle, so I didn't have to improvise that as well, but I learned from the card-weaving adventure that the popsicle sticks worked for beating down the weft threads, so at least I know I have that as a backup.
The next morning I made it to the Inkle Weaving class where we did in fact make heddles out of yarn, which was good, because my heddle was cute and colorful, but it didn't have enough holes for the pattern that we were weaving. Unfortunately, in my quest to build my loom I forgot to purchase yarn to use on the loom *head/desk* Thankfully I was able to borrow some at the event.
And so after about 2 or 3 weeks of weaving here and there I was able to complete my first band of Inkle Weaving. This pattern is called "Egyptian Key," and I learned that my loom makes a band that is just shy of 3 yards. The tension is imperfect, but I'm learning. I think I'm allowed to have an imperfect first try.


Tutorial Link: https://www.instructables.com/Discover-and-Build-an-Inkle-Loom/


Comments